The making of Mo's bike...........................more to come
General preview click the title or photo to access the gallery

Some pictures of pre-fitting the "alien" parts, it gave me an idea about the bike's intended final form. An important step in the proces of modifying . Before handling the grinder, just be sure you'll be cutting off a piece that you will not need to weld on again 5 minutes later
Adapting the frame click the title or photo to access the gallery

Cutting up the frame is reduced to a minimum, just enough to make the "vintage tank" and the custom seat fit. Take care to reinforce the structure when cutting pieces. It might be necessary to keep it strong and stable .
Adapting the vintage tank can also be found here, mind you , welding a used fuel tank can be tricky, make sure the tank is safe to weld,
Adapting the vintage tank can also be found here, mind you , welding a used fuel tank can be tricky, make sure the tank is safe to weld,
Working the tank click the title or photo to access the gallery

The original R65 tank was in a really bad shape, the lower seams were heavily corroded (through)and plastered with a ton of putty, the gastap was stuck in the hardened filth inside the tank. The idea was easy enough . In my heap of spares I had a vintage teardrop tank which (I thought )belonged to a wartime DKW NZ 350. Adapting the tank happened step by step, taking on one problem after the other. Welding busted seams, adapting the attaching points, fitting a gastap bung with a bigger inner diameter, putting in bungs for levelling the fuel in the tank halves, fitting a tankrack and then of course cleaning the tank , coating it and last but not least painting it
Inspecting the tank after cleaning the inside revealed the logo of the true maker, and it isn't DKW, it's a Russian brand (Cyrillic text), see the gallery for a close up from the inner side
Inspecting the tank after cleaning the inside revealed the logo of the true maker, and it isn't DKW, it's a Russian brand (Cyrillic text), see the gallery for a close up from the inner side
Making the seat click the title or photo to access the gallery

The neat seat, Robby's dad did the upholstery on this, a fantastic job, and he did it real fast. At this stage I have to admit , a little regret sneaked upon me , for God's sake I'm building this bike for someone else !!!!!!
Lighting modification click the title or photo to access the gallery
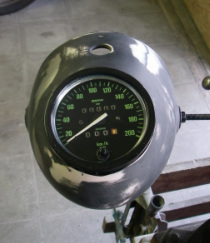
It wasn't as easy as it looks, fitting the original speedometer in the old headlight nor having the rear light installed, it took a bit of imagination to get this done
Wiring click the title or photo to access the gallery

With a BMW wiring sheme, starting from scratch is a piece of cake. Relocating turning signals, rear light, relais made the original wiring loom unusable also the condition of some wires (damaged insulation) made me doubt the good functioning of it. a totally new loom from scratch seemed the best solution
The engine click the title or photo to access the gallery
CLICK & SEE
The exhaust will be a 2 in 1, and the muffler ..................., click and see
Designing the tank logo click the title or photo to access the gallery

Designing the perfect tank decal, had to spend some time photoshopping, made three and had Mo choosing one.
